
前回はMailableを使ってのメール送信の話でした。今回は、もう1つLaravelからメールを送信する方法としてNotificationの話です。
Notificationを使用してメールを送信
Mailableを使ってメールを送信するには、
use App\Mail\SomeMailableClass;

Mail::to("test@example.com")->send(new SomeMailableClass);
が典型的な送信の仕方です。
一方、今回紹介するNotificationは、Notifiableのトレイトを使ったモデルクラスにメールを送信する機能を与えます。
例えば、このようにUserのクラスにNotifiableを追加すると、
namespace App;

use Illuminate\Contracts\Auth\MustVerifyEmail;
use Illuminate\Foundation\Auth\User as Authenticatable;
use Illuminate\Notifications\Notifiable;

class User extends Authenticatable implements MustVerifyEmail
{
    use Notifiable;
..
}
以下のように、Userのモデルのインスタンスのメソッドとして、notify()でメールを送信できます。
use App\User;
use App\Notifications\Hello;

$user = User::find(1);
$user->notify(new Hello);
上では、$userのオブジェクトの項目である、$user->emailが自動的にメール送信の宛先となります。
さて、送信するメールの内容の方は、Notificationのクラス(上ではHelloのクラス)の作成が必要です。
$ php artisan make:notification Hello
を実行して、作成されたファイルを以下のように編集します。
namespace App\Notifications;

use Illuminate\Bus\Queueable;
use Illuminate\Contracts\Queue\ShouldQueue;
use Illuminate\Notifications\Messages\MailMessage;
use Illuminate\Notifications\Notification;

class Hello extends Notification
{
    use Queueable;

    /**
     * Create a new notification instance.
     *
     * @return void
     */
    public function __construct()
    {
        //
    }

    /**
     * Get the notification's delivery channels.
     *
     * @param  mixed  $notifiable
     * @return array
     */
    public function via($notifiable)
    {
        return ['mail'];
    }

    /**
     * Get the mail representation of the notification.
     *
     * @param  mixed  $notifiable
     * @return \Illuminate\Notifications\Messages\MailMessage
     */
    public function toMail($notifiable)
    {
        return (new MailMessage)
                    ->subject('こんにちは')
                    ->greeting('こんにちは!')
                    ->line('メールの内容')
                    ->action('ホームページへ', url('/'))
                    ->line('ありがとうございます');
    }

    /**
     * Get the array representation of the notification.
     *
     * @param  mixed  $notifiable
     * @return array
     */
    public function toArray($notifiable)
    {
        return [
            //
        ];
    }
}
さてtinkerで送信してみます。
>>> $user = User::find(1);
[!] Aliasing 'User' to 'App\User' for this Tinker session.
=> App\User {#4072
     id: 1,
     name: "test",
     email: "test@example.com",
     email_verified_at: null,
     created_at: "2020-12-30 23:14:29",
     updated_at: "2020-12-30 23:14:29",
   }

>>> $user->notify(new App\Notifications\Hello);
=> null
MailTrapで送信したメールを見ると、
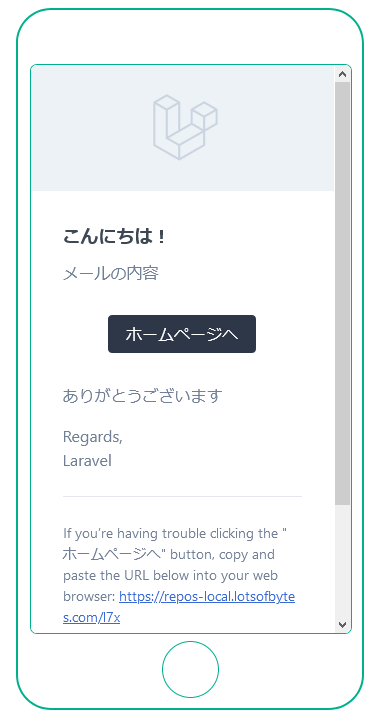
もうすでにHTMLのメールとなっています。
以下のように、文言はすべてMailMessageのクラスのメソッドで簡単に与えるだけOKです。
上の例で、まだ英語として残っているRegards, Laravelの部分を変えたいなら、以下のように、salutationのメソッドに引数を渡します。
...
   public function toMail($notifiable)
    {
        return (new MailMessage)
                    ->subject('こんにちは')
                    ->greeting('こんにちは!')
                    ->line('メールの内容')
                    ->action('ホームページへ', url('/'))
                    ->line('ありがとうございます')
                    ->salutation('Larajapan');
    }
..
送信メールをカスタマイズ
もっとHTMLメールをカスタマイズしたいなら、以下を実行してデフォルトのブレードを自分のプロジェクトのディレクトリに出力します。
$ php artisan vendor:publish --tag=laravel-notifications
Copied Directory [/vendor/laravel/framework/src/Illuminate/Notifications/resources/views] To [/resources/views/vendor/notifications]
Publishing complete.
作成された、email.blade.phpは以下のようなマークダウンのブレードです。Laravelのコンポーネントとマークダウンのシンボルが混ざっていて少しわかりづらいですが、上で使用されたメソッド名がブレードでは変数名となっているのがわかります。line()に関してはボタンの表示を境に上と下で、$introLinesと$outroLinesに分かれます。
@component('mail::message')
{{-- Greeting --}}
@if (! empty($greeting))
# {{ $greeting }}
@else
@if ($level === 'error')
# @lang('Whoops!')
@else
# @lang('Hello!')
@endif
@endif

{{-- Intro Lines --}}
@foreach ($introLines as $line)
{{ $line }}

@endforeach

{{-- Action Button --}}
@isset($actionText)
<?php
    switch ($level) {
        case 'success':
        case 'error':
            $color = $level;
            break;
        default:
            $color = 'primary';
    }
?>
@component('mail::button', ['url' => $actionUrl, 'color' => $color])
{{ $actionText }}
@endcomponent
@endisset

{{-- Outro Lines --}}
@foreach ($outroLines as $line)
{{ $line }}

@endforeach

{{-- Salutation --}}
@if (! empty($salutation))
{{ $salutation }}
@else
@lang('Regards'),<br>
{{ config('app.name') }}
@endif

{{-- Subcopy --}}
@isset($actionText)
@slot('subcopy')
@lang(
    "If you’re having trouble clicking the \":actionText\" button, copy and paste the URL below\n".
    'into your web browser:',
    [
        'actionText' => $actionText,
    ]
) <span class="break-all">[{{ $displayableActionUrl }}]({{ $actionUrl }})</span>
@endslot
@endisset
@endcomponent
もちろん、前回のように独自のマークダウンのブレードを作成して利用することも可能です。その場合は以下のように、markdown()メソッドにブレード名を入れます。
...
   /**
     * Get the mail representation of the notification.
     *
     * @param  mixed  $notifiable
     * @return \Illuminate\Notifications\Messages\MailMessage
     */
    public function toMail($notifiable)
    {
        return (new MailMessage)
                    ->subject('こんにちは!マークダウン')
                    ->markdown('emails.hello-markdown');
    }
...
メルマガ購読の申し込みはこちらから。