
昔のjQuery時代においてjquery-uiとともに有名となったのはselect2のウィジットです。オプションがたくさんあるドロップダウンでの選択や複数の値を選択を必要とされるときに非常に便利なもので、今でもその優れたUIは貴重です。今回はこれをviteでビルドします。
select2で選択
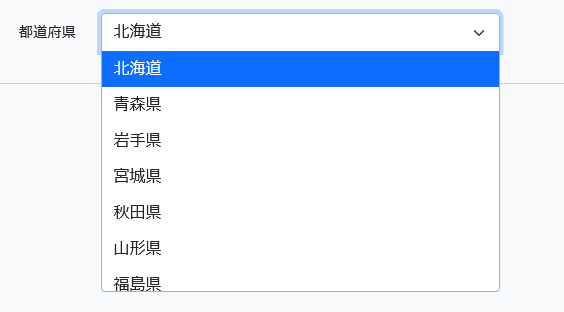
通常のドロップダウンは、以下のようにドロップダウンされた選択リストからクリックして選択です。
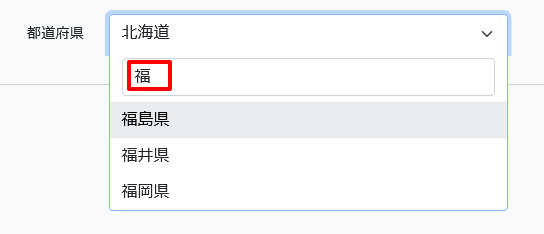
しかし、このオプションがたくさんあると探すのが大変。しかし、select2を使うと選択値の検索が可能となります。検索入力箱が表示され、赤箱の部分のように検索値を入れると、以下のようにフィルターされた結果から選択が可能となります。
通常のドロップダウンをselect2のドロップダウンにするのはとても簡単です。すでにwebpackなどでjqueryやselect2のライブラリがviteなどを利用してバンドルされていると仮定して、以下のようなブレードを作成します。
@php
    $prefectures = [
        '北海道', '青森県', '岩手県', '宮城県', '秋田県', '山形県', '福島県',
        '茨城県', '栃木県', '群馬県', '埼玉県', '千葉県', '東京都', '神奈川県',
        '新潟県', '富山県', '石川県', '福井県', '山梨県', '長野県',
        '岐阜県', '静岡県', '愛知県', '三重県',
        '滋賀県', '京都府', '大阪府', '兵庫県', '奈良県', '和歌山県',
        '鳥取県', '島根県', '岡山県', '広島県', '山口県',
        '徳島県', '香川県', '愛媛県', '高知県',
        '福岡県', '佐賀県', '長崎県', '熊本県', '大分県',
        '宮崎県', '鹿児島県', '沖縄県'
    ];
@endphp
@section('content')
<div class="container">
    <div class="row justify-content-center">
        <div class="col-md-8">
            <div class="card">
                <div class="card-header">会員登録</div>

                <div class="card-body">
                    <form method="POST" action="{{ route('register') }}">
                        @csrf
...
                        <div class="row mb-3">
                            <label for="prefecture" class="col-md-4 col-form-label text-md-end">都道府県</label>

                            <div class="col-md-6">
                                <select id="prefecture" class="form-select @error('prefecture') is-invalid @enderror" name="prefecture" required>
                                    @foreach($prefectures as $prefecture)
                                        <option value="{{ $prefecture }}" {{ old('prefecture') == $prefecture ? 'selected' : '' }}>{{ $prefecture }}</option>
                                    @endforeach
                                </select>

                                @error('prefecture')
                                    <span class="invalid-feedback" role="alert">
                                        <strong>{{ $message }}</strong>
                                    </span>
                                @enderror
                            </div>
                        </div>
...

@endsection

@section('scripts')
<script type="module">
    $(document).ready(function() {
        $('#prefecture').select2({
            theme: 'bootstrap-5',
        });
    });
</script>
@endsection
prefectureのDOMのノードにselect2のメソッドを装着するだけです。
select2で複数を選択
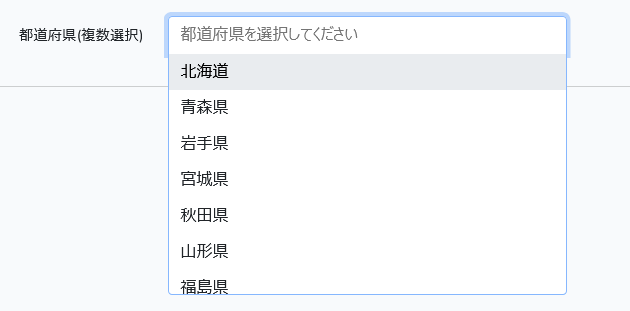
ドロップダウンで複数の選択が必要なときにselect2を使用すると、まず、何も選択されていないときは通常のドロップダウンのように表示されます。
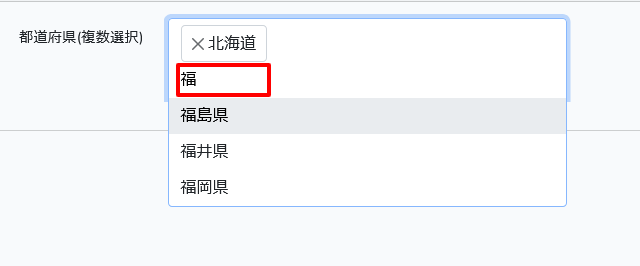
そこで「北海道」を選択すると、以下のようにピルの形状で選択値が表示されます。そのピルの先頭にあるXをクリックして削除も可能です。

次に、検索してフィルターされた結果から検索して選択します。
選択後は以下のように複数の選択値がピルの形状で並びます。

こちらのブレードは、以下のようになります。
...
                      <div class="row mb-3">
                            <label for="prefecture-multiple" class="col-md-4 col-form-label text-md-end">都道府県(複数選択)</label>

                            <div class="col-md-6">
                                <select id="prefecture-multiple" class="form-select @error('prefecture') is-invalid @enderror" name="prefectures[]" required multiple>
                                    @foreach($prefectures as $prefecture)
                                        <option value="{{ $prefecture }}" {{ in_array($prefecture, old('prefectures', [])) ? 'selected' : '' }}>{{ $prefecture }}</option>
                                    @endforeach
                                </select>

                                @error('prefectures')
                                    <span class="invalid-feedback" role="alert">
                                        <strong>{{ $message }}</strong>
                                    </span>
                                @enderror
                            </div>
                        </div>
...
@section('scripts')
<script type="module">
    $(document).ready(function() {
        $('#prefecture-multiple').select2({
            theme: 'bootstrap-5',
            placeholder: '都道府県を選択してください',
        });
    });
</script>
@endsection
DOMのノードへのselect2のメソッドの装着は先の単一の選択とたいして変わりません。しかし、選択開始前に表示するplaceholderがオプションとして追加されています。
select2をviteでビルド
viteを使ってselect2のビルドを作成してみましょう。
まず、select2とBootstrap 5のパッケージを以下でローカル環境にインストールします。
$ npm install select2 --save-dev
$ npm install select2-bootstrap-5-theme --save-dev
そして、bootstrap.jsにおいてそれらをインポートします。
import 'bootstrap';
import JQuery from 'jquery';
window.$ = window.jQuery = JQuery;

import select2 from 'select2';
select2(); // どうして必要なのかわからないけれど、これは必須!

// select2のcssをインポート
import "/node_modules/select2/dist/css/select2.min.css";
// さらに、bootstrap5のcssをインポート
import "/node_modules/select2-bootstrap-5-theme/dist/select2-bootstrap-5-theme.css";
viteの設定は以下となります。
import { defineConfig } from 'vite';
import laravel from 'laravel-vite-plugin';

export default defineConfig({
    plugins: [
        laravel({
            input: [
                'resources/sass/app.scss',
                'resources/js/app.js',
            ],
            refresh: true,
        }),
    ],
});
最後に
$ npm run build
とビルドします。
メルマガ購読の申し込みはこちらから。