
当サイトでも以前ご紹介しているLaravelのMailableですが、Laravel9.xから新しくなったようです。今までの書き方と何が違うのか?試してみました。使用バージョンはLaravel10.19になります。
HTMLメールを送信
まずは、新しいMailableクラスを作成します。以下のコマンドでTestMail.phpというファイルが作成されます。
$ php artisan make:mail TestMail
作成されたファイルを見てみると、旧Mailableにはあったbuildが無くなっています。代わりにenvelope、content、attachmentsというメソッドが用意されていますね。
namespace App\Mail;

use Illuminate\Bus\Queueable;
use Illuminate\Contracts\Queue\ShouldQueue;
use Illuminate\Mail\Mailable;
use Illuminate\Mail\Mailables\Content;
use Illuminate\Mail\Mailables\Envelope;
use Illuminate\Queue\SerializesModels;

class TestMail extends Mailable
{
    use Queueable, SerializesModels;

    /**
     * Create a new message instance.
     */
    public function __construct()
    {
        //
    }

    /**
     * Get the message envelope.
     */
    public function envelope(): Envelope
    {
        return new Envelope(
            subject: 'Test Mail',
        );
    }

    /**
     * Get the message content definition.
     */
    public function content(): Content
    {
        return new Content(
            view: 'view.name',
        );
    }

    /**
     * Get the attachments for the message.
     *
     * @return array<int, \Illuminate\Mail\Mailables\Attachment>
     */
    public function attachments(): array
    {
        return [];
    }
}
ここから、今回必要な箇所を編集してゆきます。
1つ目のenvelopeでは、件名・送信者・返信先に関する情報を設定できます。新しくAddressクラスが使えるようになっており、名前つきメールアドレスが作成できます。
Addressを使用する際は、クラスをuseしてくださいね。
use Illuminate\Mail\Mailables\Address;

    public function envelope(): Envelope
    {
        return new Envelope(
            subject: 'Test Mail',
            from: new Address('from@example.com', 'テスト送信者'),
        );
    }
次のcontentでは本文の設定を行います。今回はHTMLメールを送信するので、簡単なものですが以下のようなブレードを作成しました。
<html>
  <body>
    <h1>新しいMailableです</h1>
  </body>
</html>
このブレードのパスを、contentに記述します。パスはresources/views以下の部分のみでOKです。
    public function content(): Content
    {
        return new Content(
            html: 'emails.test',
        );
    }
最後のAttachmentは、添付ファイルについて定義します。
AttachmentのfromPathメソッドに、添付ファイルへのパスを渡します。あらかじめstorage/app/img内にtestmail.jpgという画像ファイルを用意したので、そちらを記述しました。
use Illuminate\Mail\Mailables\Attachment;

    public function attachments(): array
    {
        return [
            Attachment::fromPath(storage_path('app/img/testmail.jpg')),
        ];
    }
Attachmentを使用する場合も、useが必要ですのでお忘れなく。
これで設定は完了です!さっそくtinkerでメールを送信します。
$ php artisan tinker
Psy Shell v0.11.20 (PHP 8.1.17 — cli) by Justin Hileman
> use App\Mail\TestMail;
> Mail::to('test@example.com')->send(new TestMail);
= Illuminate\Mail\SentMessage {#6331}
受信をメールを確認してみましょう。私のローカル環境では、Mailtrapに届くように設定しています。
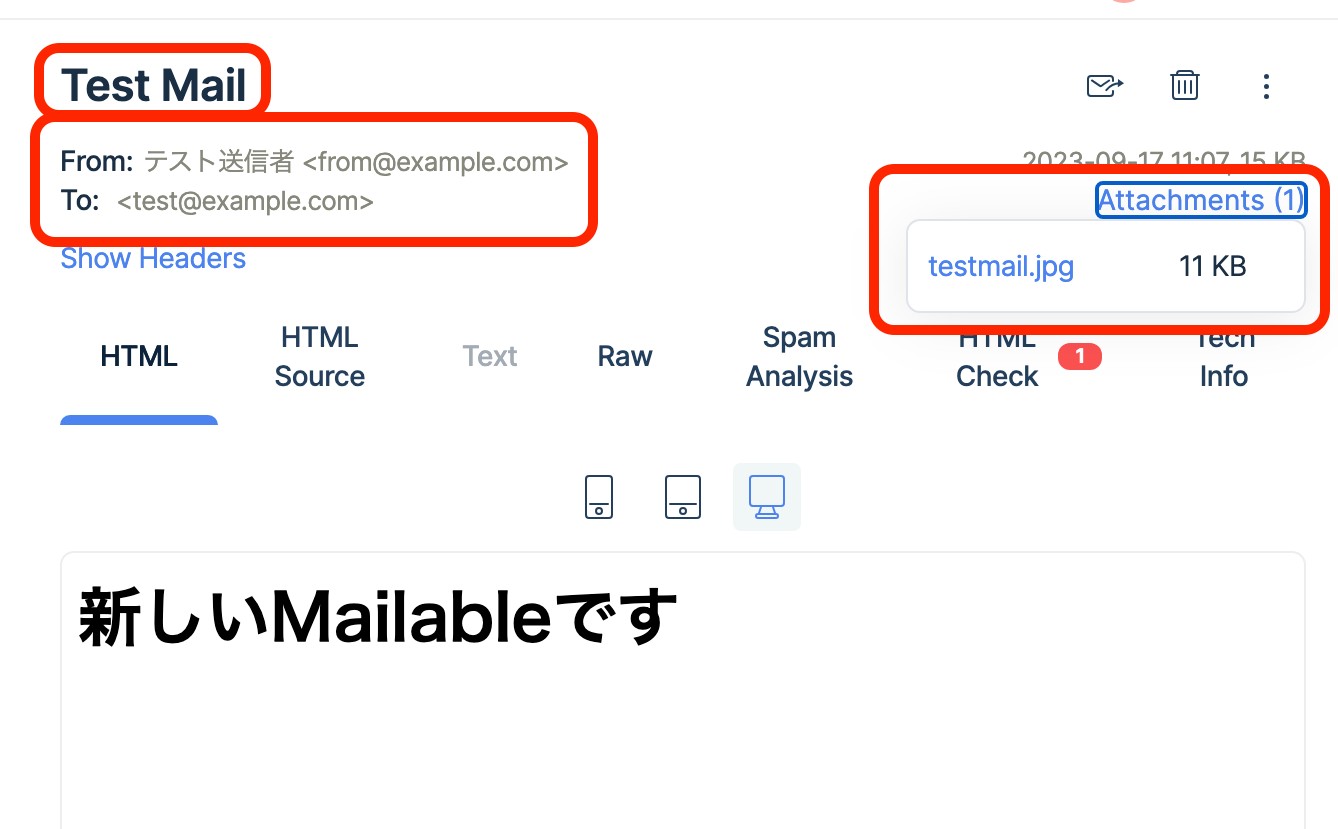
件名、From、本文、いずれも設定した通りになっていますね。画像ファイルも添付されています。
今回は新しくなったMailableを試してみました。8.x系で使用していたbuildは新しいMailableでも引き続き使用可能ですが、設定項目がそれぞれの関数に分かれている新しいMailableの方が、より分かりやすくなったように感じます。
次回は、Mailableで簡単にレスポンシブなHTMLメールが作成できる、MJMLというライブラリをご紹介します。
メルマガ購読の申し込みはこちらから。