
LaravelのNotificationはEメールやSMSなど多用なチャンネルへの情報発信に便利なものですが、その1つのチャンネルとしてbroadcastがあります。今回は、それを使用してチャットと同様にリアルタイムで情報をユーザーに発信します。
欲しい機能
簡単なデモとして、tinkerで以下のように、登録しているユーザー(ここでは太郎さん)にHello!というメッセージをNotificationを使用して送信します。
> use App\Notifications\Toast;
> $user = User::first();
> $user->notify(new Toast('Hello!'));
太郎さんがログインしてチャット画面にいるとして、
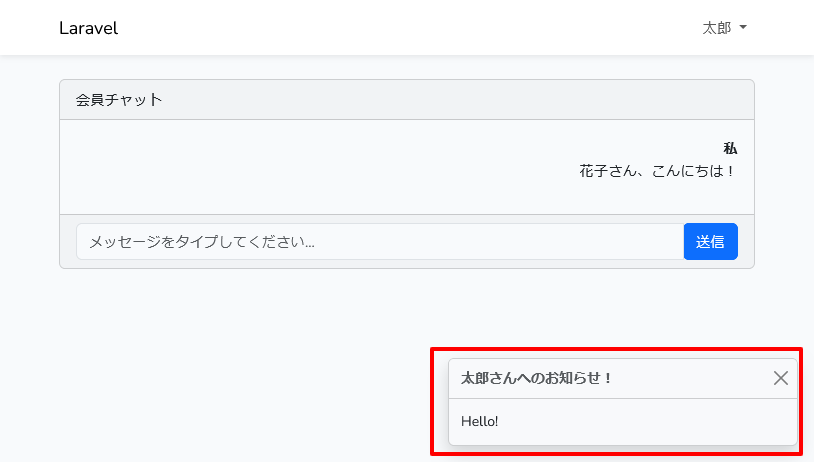
のように画面の右下隅にBootstrap5のToastがポップアップして情報を伝えます。
ソースコード
今回の機能を追加したソースコードは、前回の会員チャットをもとにして違うgitブランチ(chat-notification)としました。
レポジトリはこちらですが、すでにデモのソースコードをインストールしているなら、以下でスイッチできます。
$ git fetch
$ git checkout chat-notification
を実行してブランチをゲットできます。
masterとの差分は以下です。
$ git diff master --name-status
A       app/Notifications/Toast.php
M       resources/js/bootstrap.js
M       resources/js/chat.js
A       resources/js/components/ChatToast.vue
M       resources/views/chat.blade.php
M       resources/views/layouts/app.blade.php
M       routes/channels.php
前回と同様に以下のコマンドを実行すると、ブラウザでテストが可能です。
$ npm run build
$ php artisan serve
送信側
特定のユーザーにNotificationを使用してEメールの送信の仕方は、過去にこちらで説明しました。
Websocketを使用して送信するには、以下のようにNotificationの定義においてbroadcastを指定します。
namespace App\Notifications;

use Illuminate\Bus\Queueable;
use Illuminate\Notifications\Notification;
use Illuminate\Notifications\Messages\BroadcastMessage;

class Toast extends Notification
{
...
    /**
     * Get the notification's delivery channels.
     *
     * @return array<int, string>
     */
    public function via(object $notifiable): array
    {
        return ['broadcast'];
    }

    /**
     * Get the broadcastable representation of the notification.
     *
     * @param  mixed  $notifiable
     * @return BroadcastMessage
     */
    public function toBroadcast($notifiable)
    {
        return new BroadcastMessage([
            'name'    => $notifiable->name,
            'message' => $this->message,
        ]);
    }
...
そして送り先のユーザーのインスタンスのモデルでは、以下のようにNotifiableのトレイトがあることが必要です。
namespace App\Models;

// use Illuminate\Contracts\Auth\MustVerifyEmail;
use Illuminate\Database\Eloquent\Factories\HasFactory;
use Illuminate\Foundation\Auth\User as Authenticatable;
use Illuminate\Notifications\Notifiable;
use Laravel\Sanctum\HasApiTokens;

class User extends Authenticatable
{
    use HasApiTokens, HasFactory, Notifiable;
...
最終的に以下のようなコードで送信します。
use App\Notifications\Toast;
$user = User::first();
$user->notify(new Toast('Hello!'));
ToastのNotificationはイベントとしてPusher側で受け取りクライアントに流します。
以下は、その直後のPusherのDebug Consoleでの画面です。Pusher側では、チャンネル名は private-App.Models.User.1となっていて、イベントは、Illuminate\Notifications\Events\BroadcastNotificationCreatedとLaravelのイベントとなっていますね。

クライアント
クライアント側では、チャット同様にPusherからの情報を受け取るためのコードが必要となりますが、チャットのlistenではなく、notificationとなります。
...
createApp({
    setup () {
        const messages = ref([]);
        const toast = ref({});

        fetchMessages();

        window.Echo.private('chat')
            .listen('MessageSent', (e) => {
                messages.value.push({
                    message: e.message.message,
                    user: e.user
                });
            });

        window.Echo.private('App.Models.User.' + window.userId)
            .notification((notification) => {
                toast.value = notification;
            });
...
しかし、特定した以外のユーザーのサーバーからの情報が流れては困るので、チャット同様にこのためのプライベートチャンネル購読の認証が必要となります。プライベートチャンネル名は、App.Models.User.ユーザーID と特定のユーザーのためなユニークなチャンネル名となります。
クライアントにおいてそのユーザーのIDをサーバーから取得するために、以下のようなレイアウトのテンプレートに工夫が必要となります。
...
   @auth
        <script>
            window.userId = {{ auth()->user()->id }};
        </script>
    @endauth
</body>
</html>
そして認証時には、以前にここで説明したように、サーバー側での認証となります。
use Illuminate\Support\Facades\Auth;
use Illuminate\Support\Facades\Broadcast;

/*
|--------------------------------------------------------------------------
| Broadcast Channels
|--------------------------------------------------------------------------
|
| Here you may register all of the event broadcasting channels that your
| application supports. The given channel authorization callbacks are
| used to check if an authenticated user can listen to the channel.
|
*/
// Notificationのプライベートチャンネルの認証
Broadcast::channel('App.Models.User.{id}', function ($user, $id) {
    return (int) $user->id === (int) $id;
});

// チャットのプライベートチャンネルの認証
Broadcast::channel('chat', function ($user) {
    return Auth::check();
});
複数のユーザーにnotify
Notificationは、以下のように複数のユーザーに一括しての情報送信も可能です。
$users = User::all();
Notification::send($users, new Toast('Hi!'));
しかし、以下のPusherのDebug Consoleで見られるようにユーザーの人数分だけウェブサーバーからPusherサーバーにイベント情報が流れます。それぞれで情報が異なる(今回の例では名前の情報が異なる)なら別ですが、まったく同じ情報を送信するなら効率的ではありません。そのようなときはチャットと同様にログインした会員すべてに対してのイベントとして送信した方がよいです。
